
How to Set Up and Export an InDesign File for Print
- Emily Steel
- Apr 17, 2024
- 2 min read
Updated: Apr 16, 2025
By Omega High-Impact Print Solutions' Marketing Manager, Emily Steel
Welcome to our comprehensive guide on setting up and exporting Adobe InDesign files for print! Whether you're a seasoned designer or just dipping your toes into the world of print design, understanding the intricacies of preparing files for print is essential. In this step-by-step tutorial, we'll walk you through everything you need to know to ensure your designs translate seamlessly from the digital realm to the printed page.

Step1
Open a new file in InDesign by opening the app and clicking the blue NEW FILE button in the top left corner.

Step 2
In the new document pop-up window, select the PRINT tab on the top of the window and select the appropriate template you would like to start from. The settings of your document will automatically update as you select different templates.

Step 3
You can change the units of measure by selecting the UNITS dropdown on the left side. This allows you to see the size of your document in inches, centimeters, pixels, etc.

Step 4
If you are creating a document that is not the size of one of the templates, you can adjust the Width and Height to the appropriate sizes.

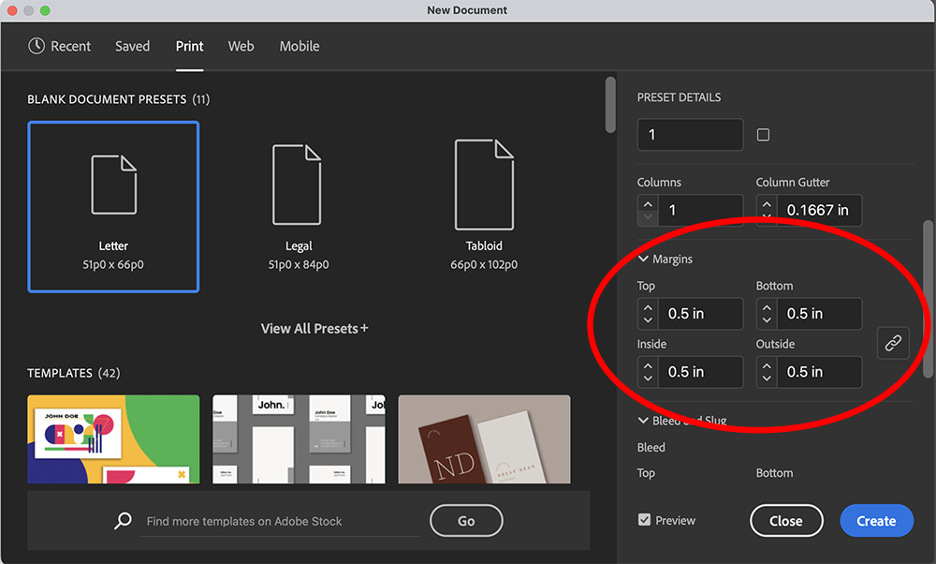
Step 5
To adjust the margins, scroll down the right side of the window. The settings default to all of the sides being the same measurement. However, if you would like the margins to be different on each side, click the button that looks like a link and it will appear as a broken link. Now you can set each side to its own margin. If you click the link again, it will set all of the sides to the same margin.
Step 6
Scroll down on the right side again to add a bleed for text, images, background colors, etc. that you want to run off the page. This provides additional area if the document does not get trimmed precisely on the document edge. Most printers recommend a 0.125 in. bleed.

Step 7
To see your document and ensure your settings are correct, click the small box next to Preview located in the bottom right of the window. If you are satisfied with the preview, click the blue CREATE button in the bottom right. After completing your design, export the document as a PDF.

Step 8
Go to FILE>EXPORT. Name the document appropriately in the SAVE AS field at the top of the window. Select where you would like to save the document. In the FORMAT dropdown, make sure to select Adobe PDF (Print). A pop-up window will appear. On the left side of the pop-up window, select MARKS AND BLEEDS.

Step 9
Click the EXPORT button in the bottom right of the window.

InDesign print file setup
We hope this tutorial has equipped you with the knowledge and confidence to tackle your print design projects with ease. Remember, attention to detail is key when preparing files for print, so always double-check your settings and ensure your designs meet the printer's specifications. With the right techniques and a little practice, you'll be producing stunning printed materials in no time. Happy designing!


Comments